This guide provides step-by-step instructions on how to find your AvantLink US, CA, and AU credentials and add them to FMTC. By following these steps, your merchant relationship statuses will automatically sync (once every 24 hours) with FMTC.
These instructions explain how to:
*You must add your Website ID before you can set up MerchantSync.
Last update: 2/23/2024
To add your AvantLink Website ID to your FMTC account, start here.
Your Website ID is not your Affiliate ID.
Your Website ID is different for each country.
Cycle through these instructions for each country you work with in AvantLink.
Cycle 1 - US
Cycle 2 - CA
Cycle 3 - AU
*To go to a different country (Account) in AvantLink, use the dropdown arrow in the upper right, or log in with separate credentials. You need to login to each account because your Website ID is different for each country.
.jpg?cb=539539c14344eee802ddc22de4402d14)
-
Login to AvantLink with Admin access - https://arches.avantlink.com/login
-
🇺🇸 For Cycle 1, confirm you are logged in to your US account: use the dropdown arrow in the upper right, or log in with separate credentials.
🇨🇦 Cycle 2 - Canada.
🇦🇺 Cycle 3 - Australia.
.jpg?cb=b68cc6c65d89235d46c6d453d6c6daff)
-
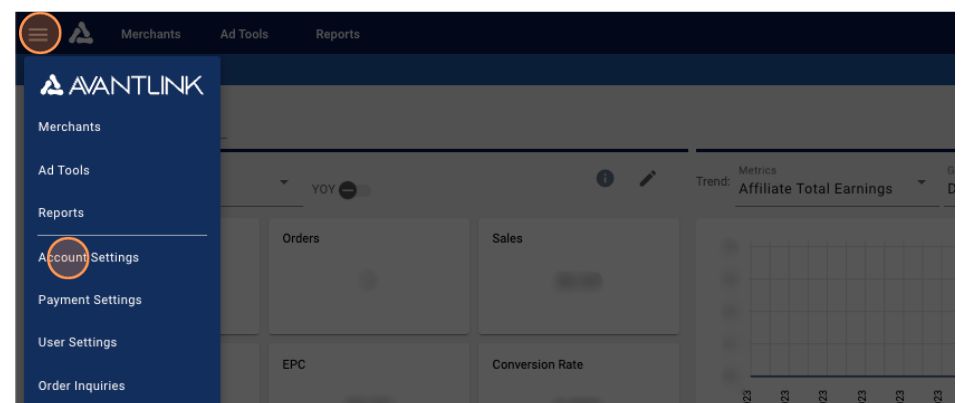
Click on the hamburger menu in the upper left, then “Account Settings”
-
Click on “Secondary Websites” then copy the number under Website ID
.jpg?cb=2618615980a4c89c886d52fb8b7821f0)
-
Go to your FMTC dashboard - https://account.fmtc.co/cp/dash
-
Click "Relationships" then “Manage Network IDs”
.jpg?cb=3ac6220a2ec534b1767cbfe4ae92752f)
-
🇺🇸 Cycle 1 - US: Under US Affiliate Networks, click in the "AvantLink (AL)" box, add your US Website ID, then click “Save”
.jpg?cb=5f8f5347270a670b9dadbe6fc296e803)
-
🇨🇦 Cycle 2 - Canada: Login to your Canada Account in AvantLink and cycle through the steps to get your Website ID.
In FMTC, scroll down to Canada Affiliate Networks, click in the "Avantlink.ca (ALC)" box, add your CA Website ID, then click “Save”
.jpg?cb=e5403e908f21692131730dcc80512c29)
-
🇦🇺 Cycle 3 - Australia: Login to your Australia Account in AvantLink and cycle through the above steps to get your Website ID.
In FMTC, scroll down to Australia Affiliate Networks, click in the "AvantLink AU (ALA)" box, add your AU Website ID, then click “Save”
.jpg?cb=bdf9e1451f2d0594bb8ebb089d3849e7)
Nice job: you added your AvantLink Website IDs to FMTC!
To set up MerchantSync for AvantLink, first add your Website IDs, then proceed from here.
Your credentials are different for each country.
Cycle through these instructions for each country you work with in AvantLink.
Cycle 1 - US
Cycle 2 - CA
Cycle 3 - AU
-
Login to AvantLink with Admin access - https://arches.avantlink.com/login
-
🇺🇸 For Cycle 1, confirm you are logged in to your US account: use the dropdown arrow in the upper right, or log in with separate credentials.
🇨🇦 Cycle 2 - Canada.
🇦🇺 Cycle 3 - Australia.
-
Click “Ad Tools" then under AvantLink API, click “Create”
.jpg?cb=425c6fa79bdca1675caee12daf98fcdc)
-
Click "API Key" then copy your Affiliate ID and your API Authorization Key
.jpg?cb=55b495ff59537768838adbc06f334d32)
-
Go to your FMTC dashboard - https://account.fmtc.co/cp/dash
-
Click "Relationships" then "MerchantSync"
.jpg?cb=876edce09a815906cab95b96667d9ecb)
-
Scroll down to Status. Toggle “Sync network relationships with FMTC” on (On = Green). *This setting applies to all networks; you only have to toggle this on once.

-
🇺🇸 Cycle 1 - US: Click the first AvantLink logo (US account)
.jpg?cb=032be26b4c2521f314fc70cd7be426a2)
-
Click "Edit" then paste your Affiliate ID in the Affiliate ID box, and paste your API Authorization Key in the Secret Key box.
.jpg?cb=e5e40468906a2195c61ec5f5d80ef8b3)
-
Click "Save"
.jpg?cb=703efe12fefc0eba546bee7143e9048e)
-
Click “Sync” - if setup correctly, a green confirmation box and the quantity of merchants synced is shown
.jpg?cb=e67d61b1875013135916c82cf4a80174)
-
🇨🇦 Cycle 2 - Canada: Login to your Canada Account in AvantLink and cycle through the above steps to get your Affiliate ID and your API Authorization Key.
-
On FMTC’s MerchantSync page, click the third AvantLink logo (CA account)
.jpg?cb=0fafce7cd131068915a17f78e78ebca9)
-
Click "Edit" then paste your Affiliate ID in the Affiliate ID box, and paste your API Authorization Key in the Secret Key box.
.jpg?cb=402d35257499a7915235c7d7c43ee659)
-
Click "Save"
.jpg?cb=8451c6345a70d1471221bfbe2b21b869)
-
Click “Sync” - if setup correctly, a green confirmation box and the quantity of merchants synced is shown
.jpg?cb=272abd6a9494ed91b1c0731172b99e20)
-
🇦🇺 Cycle 3 - Australia: Login to your Australia Account in AvantLink and cycle through the above steps to get your Affiliate ID and your API Authorization Key.
-
On FMTC’s MerchantSync page, click the second AvantLink logo (AU account)
.jpg?cb=e1fb8b7cb373cd3a296d07e967977466)
-
Click "Edit" then paste your Affiliate ID in the Affiliate ID box, and paste your API Authorization Key in the Secret Key box.
.jpg?cb=26ef941abf71648445000095b425136f)
-
Click "Save"
.jpg?cb=a2b0b8239bbb88fb7ff0630bd2b64261)
-
Click “Sync” - if setup correctly, a green confirmation box and the quantity of merchants synced is shown
.jpg?cb=8b8ec868e658bc6361ce467b608129f0)
Well done, you added your MerchantSync credentials!
Now that MerchantSync is set up, your merchant relationship statuses will automatically sync (once every 24 hours) with FMTC.